Airsoft Canada
http://triggerairsoft.com/shop/

Go Back   Airsoft Canada > Discussion > Upgrades & Modifications
Home Forums Register Gallery FAQ Calendar
Retailers Community News/Info International Retailers IRC Today's Posts

Coloring the engravings on the rifle

:

Upgrades & Modifications

Reply
 
Thread Tools
Old August 20th, 2005, 16:18   #1
Affliction
a.k.a. Fury a.k.a. VipaMave
 
Join Date: Jun 2005
Location: Markham-ON
Coloring the engravings on the rifle

More questions about paint :P

I was wondering how I would go about painting the colt engravings on my G&P M4A1. It seems difficult but I have some spare time.

Best way to do this?
Thanks-VM
Affliction is offline   Reply With Quote
Old August 20th, 2005, 16:35   #2
Aper
E-30
 
Aper's Avatar
 
Join Date: Jan 2004
Location: Aegiis's Neighbor.
I have a very good way to do it;

- Apply some paint all over the engravings with a medium size brush, even if it has to go on the body itself
- Make sure the engraving are fulled with paint
- Take a clean & dry cloth, apply few drop of Acetone
- Wipe off the excedent paint on the body, letting the engravings untouched

This technique has been applied on my MP5K and my AK, and the results are awesome. Some people have been painting the engravings with precision brushes, but IMO it takes to much time, and the finish may be not as great as the one shown above.

Cheers !
__________________

West Coast EOD Supporter. // Bang One, Bang Em All ! // In war, it's not who's right, but who's left.
Aper is offline   Reply With Quote
Old August 20th, 2005, 16:45   #3
Affliction
a.k.a. Fury a.k.a. VipaMave
 
Join Date: Jun 2005
Location: Markham-ON
Wow, great idea. What type of paint did you use?

Thanks for the great reply-VM
Affliction is offline   Reply With Quote
Old August 20th, 2005, 16:55   #4
CDN_Stalker
Official ASC Bladesmith
 
CDN_Stalker's Avatar
 
Join Date: Jul 2003
Location: Ottawa, Ont.
Send a message via MSN to CDN_Stalker
White Crayola crayon. Rub it on in all directions so the crayon goes perpendicular to the lines and all have been filled, then rub your finger vigourously over top to rub off excess crayon. All that will be left is what is in the lines. Did it to all my guns last year, still shows white. Dirt cheap and painless too.
CDN_Stalker is offline   Reply With Quote
Old August 20th, 2005, 17:12   #5
Aper
E-30
 
Aper's Avatar
 
Join Date: Jan 2004
Location: Aegiis's Neighbor.
Quote:
Originally Posted by VipaMave
Wow, great idea. What type of paint did you use?

Thanks for the great reply-VM
I used Testors scale model paint, but you can use any kind of paints, from latex to acrylic to oil paint. I had best experience with Testors paints, and a small bottles costs 2-3$ at top, and available in pretty much any colors wanted.
__________________

West Coast EOD Supporter. // Bang One, Bang Em All ! // In war, it's not who's right, but who's left.
Aper is offline   Reply With Quote
Old October 21st, 2005, 03:28   #6
BigD
 
Join Date: Apr 2004
Location: Hamilton Ontario
Send a message via MSN to BigD
I used a tooth pick and just wiped off any excess spots right away turned out well. Though it did take a few coats to get it right and was somewhat time consuming. I like the crayola idea!
__________________
Those who beat their swords into plow shares, usually end up plowing for those who didn't.
BigD is offline   Reply With Quote
Old October 21st, 2005, 13:08   #7
HGI
 
HGI's Avatar
 
Join Date: Dec 2003
Location: Nanaimo
Mix some paint thinner with the paint and just tuch the letter and the paint thinner will run through the letter.
HGI is offline   Reply With Quote
Old October 21st, 2005, 16:58   #8
gandar
 
gandar's Avatar
 
Join Date: Oct 2004
Location: Sault Ste. Syberia, ON
Send a message via MSN to gandar
Quote:
Originally Posted by Aper
I have a very good way to do it;

- Apply some paint all over the engravings with a medium size brush, even if it has to go on the body itself
- Make sure the engraving are fulled with paint
- Take a clean & dry cloth, apply few drop of Acetone
- Wipe off the excedent paint on the body, letting the engravings untouched

This technique has been applied on my MP5K and my AK, and the results are awesome. Some people have been painting the engravings with precision brushes, but IMO it takes to much time, and the finish may be not as great as the one shown above.

Cheers !

That's exactly what I was gonna suggest, works fab, I've done a number of projects like that, not guns, but similar situations. Most effective way IMO, and yeah, like you said, testors works great for it. I love that stuff for small work.
__________________
Ubique Quo Fas et Gloria Ducunt


Alternatively, I could just light you on fire. - Me
gandar is offline   Reply With Quote
Old October 21st, 2005, 18:56   #9
HGI
 
HGI's Avatar
 
Join Date: Dec 2003
Location: Nanaimo
Quote:
Originally Posted by CDN_Stalker
White Crayola crayon. Rub it on in all directions so the crayon goes perpendicular to the lines and all have been filled, then rub your finger vigourously over top to rub off excess crayon. All that will be left is what is in the lines. Did it to all my guns last year, still shows white. Dirt cheap and painless too.

Woah all I can say is WOW!!!!

It makes total sence... crayons are cheap and everyone got them hanging around the house!! Finaly the white ones are usefull.

I missed your post when I 1st posted but this works great!! I decided to try this on my M3 this moarning and it worked out vary well!!

Photos are here but they are a little blury.
http://www.airsoftcanada.com/showthr...793#post227793
HGI is offline   Reply With Quote
Old October 22nd, 2005, 13:58   #10
fantastix
 
fantastix's Avatar
 
Join Date: Mar 2004
Location: Windsor, Ont
Oil pastels work better. They are softer and waterproof. You may have to wet a rag to wipe the excess off the receiver though.
__________________
Before the internet, the village idiot would stay in his own village.
fantastix is offline   Reply With Quote
Old January 25th, 2006, 02:53   #11
.:Seaforth:.
 
.:Seaforth:.'s Avatar
 
Join Date: Oct 2005
Location: Surrey BC
you know if you go to any art store they have grease pens there i believe you can get them at Hardware stores to but they arent as good all you do is color all over the spot you want to fill in and i mean all over then you wait a little bit like 2 min. and wipe off the excess and they come in a variety of colors and its water proof and perm. almost exactly like the crayon but it gives a look like paint wet paint but its not.


ps. i do it to all my dog tags like my black ones are filled with white and my silver ones are filled with black to give them an old look.

turns out great.
.:Seaforth:. is offline   Reply With Quote
Old April 4th, 2006, 14:50   #12
jackcolson
 
Join Date: Mar 2005
Location: Barrie
If you havent done so already...here is the best way..buy a white crayon just smudge the crayon over the engravings (so the wax fills the markings) then take a warm cloth and whipe away the excess around the egravings...voila.
jackcolson is offline   Reply With Quote
Old July 29th, 2006, 08:37   #13
Whodini
 
Whodini's Avatar
 
Join Date: Jul 2006
Location: Kelowna, BC
Send a message via MSN to Whodini
Quote:
Originally Posted by Aper
I have a very good way to do it;

- Apply some paint all over the engravings with a medium size brush, even if it has to go on the body itself
- Make sure the engraving are fulled with paint
- Take a clean & dry cloth, apply few drop of Acetone
- Wipe off the excedent paint on the body, letting the engravings untouched

This technique has been applied on my MP5K and my AK, and the results are awesome. Some people have been painting the engravings with precision brushes, but IMO it takes to much time, and the finish may be not as great as the one shown above.

Cheers !
DO NOT do that, unless you are EXTREMELY careful! Acetone can easily melt the plastic, and ruin the looks of your gun big time.

My own technique involves enamel model paint, a soft polishing cloth(A tissue won't work good), fine grit sandpaper(300 all the way to 600) and patience.
First, slop the paint onto the engraving, wait about one minute, take the polishing cloth and wipe off all of the paint on the outside. some paint will remain, but don't worry. Let the paint dry a few hours, or overnight, if you wish. when the paint is nice and dry, take the 300 grit sandpaper, sand off the paint that is around the engraving, working your way to 600 grit. If you wish for a real smooth finish, use some automotive sandpaper. The stuff that goes down to 2000 grit. It's a little more complicated than the crayon trick, but it works well. In this example I used 3 in 1 house oil to lubricate the wet-or-dry sandpaper. It gave a better finish than just water.


Whodini is offline   Reply With Quote
Old August 11th, 2006, 04:21   #14
KraziAzn
 
KraziAzn's Avatar
 
Join Date: May 2006
Location: USA
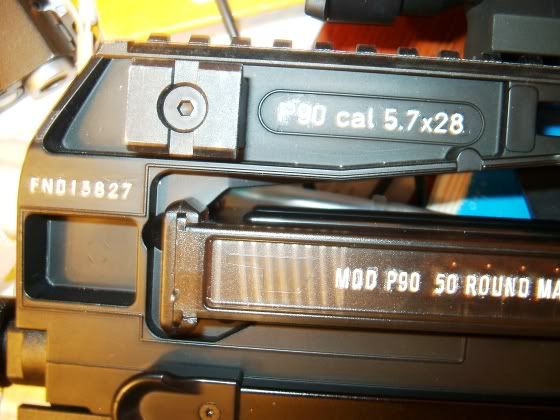
i just use a white out pen on my P90..took me like 10minutes


__________________
KraziAzn is offline   Reply With Quote
Old August 6th, 2007, 19:26   #15
Omi-san
 
Join Date: May 2007
Location: Montréal
Quote:
Originally Posted by Whodini View Post
DO NOT do that, unless you are EXTREMELY careful! Acetone can easily melt the plastic, and ruin the looks of your gun big time.

I think the original post was about G&P M4 metal body.
Omi-san is offline   Reply With Quote
ReplyTop


Go Back   Airsoft Canada > Discussion > Upgrades & Modifications

Bookmarks

Thread Tools

Posting Rules
You may not post new threads
You may not post replies
You may not post attachments
You may not edit your posts

BB code is On
Smilies are On
[IMG] code is On
HTML code is Off


Airsoft Canada
http://triggerairsoft.com/shop/

All times are GMT -4. The time now is 01:34.


Powered by vBulletin® Version 3.8.11
Copyright ©2000 - 2024, vBulletin Solutions Inc.