

|
|
|
#106 |
 I am not going to be a we pistol ever again.... I am waiting on a Reaps bucking from overseas. |
|
|
|

|
|
|
#107 |
|
I've been looking for some cheapish mags, and after looking high and low, i was wondering if the KJW G23 mags would fit in my TM G17.
KJW is apparently a TM clone, and does take TM mags, so I was wondering if anyone had any first hand experience. How do the KJW mags fair in gas consumption/ output vs the TM mags? |
|
|
|

|
|
|
#108 |
|
G23 mag is shorter than a G17 mag. Like RS Glock all the TM "system" mag is interchangeable, but only going from long mag to smaller gun....
You can use a TM G17 mag in a KJW G23 or a TM G26. But they don't go the other way... |
|
|
|

|
|
|
#109 |
|
ohh, I see. Thanks for the speedy reply
|
|
|
|

|
|
|
#110 |
|
STRESS Test: Glock Frames
After running many tests, I've finally managed to break a few of my HK3/Guarder frames. lol. I was bored. For those who are interested, here are my test results. For my purpose, the ease of attaining a full auto and semi auto in one gun, I had to use my Marui Glock 18c and a HK3 G18c running on Coleman Propane on .20g BB Basteeeerrds. Of course there are relative factors that can affect my test results (ie. Temperature of the magazine breaks between mag changes, etc etc etc.) SO I can only speak for my experience with my guns. Your gun may be a different animal altogether. First test: Platform: HK3 G18c Set up: STOCK Magazines cap: 24+ 1 Firing mode: Semi Mags before breakage: 25 at 25rds each Comments: The HK3 Frame is able to withstand the pressure from a propane magazine longer than the stock Marui frame. Good stuff!!!! Second test: Platform: HK3 G18c Set up: STOCK Magazines cap: 24 + 1 Firing mode: Full auto Mags before signs of breakage: 22 at 25rds each Comments: With a significantly higher ROF, the repeated force of the slide return seems to have caused two cracks that continued on to become much more in the latter stages of the testing. Third test: Platform: Marui G18c Set up: Guarder frame installed Magazines cap: 24 + 1 Firing mode: Semi Mags before signs of breakage: 18 at 25rds each Comments: The significant lightly weighted slide proves to create more kinetic energy than a metal slide with a strengthened recoil spring. Fourth test: Platform:Marui G18c Set up: Guarder Frame installed Magazines cap: 24 + 1 Firing mode: Full auto (no Burst) Mags before signs of breakage: 9 at 25rds each Comments: Not surprised that the stock slide completely severed the screw casing from the frame at the base. The good thing is, the screw casing in this case is salvageable because it didn’t shatter like a stock Marui frame would. Fifth test: Platform: Marui G18c Set up: Guarder Frame + metal slide Magazines cap: 24 + 1 Firing mode: Semi Mags before signs of breakage: 45 at 25rds each Comments: This was a shock for me as I expected the stock slide to preserve the casing much more than a metal slide does. Sixth test: Platform: Marui G18c Set up: Guarder frame + metal slide Magazines cap: 24 + 1 Firing mode: full auto (no burst) Mags before signs of breakage: 39 at 25rds each Comments: If you had any doubts that a full auto setting was doing harm, here is the proof. The metal slide on a guarder frame firing on full auto nearly shortened the life span of the screw casing by nearly a half. Seventh test: Platform: Marui G18c Set up: Guarder Frame + stock slide with 150% recoil spring and hammer spring Magazines cap: 24 + 1 Firing mode: full auto (no bursts) Mags before signs of breakage: 30ish at 25rds each Comments: Adding more stress to the full auto, the idea of a strong recoil spring is generally what is accepted. But I found that it actually sped up the deterioration process. Eight test: Platform: Marui G18c Set up: Guarder Frame + guarder Steel slide/barrel with 200% recoil spring and 150% Shooter's Design hammer spring Magazines cap: 24 + 1 Firing mode: full auto (no bursts) Mags before signs of breakage: 11 at 25rds each Comments: Again this was unexpected. I expected the weight of the steel slide to match the power of recoil spring. It actually did the opposite. Ninth test: Platform: Marui G18c Set up: Guarder Frame + Guarder aluminum slide with 150% recoil spring and hammer spring Magazines cap: 24 + 1 Firing mode: Semi Mags before signs of breakage: 40 at 25rds each Tenth test: Platform: Marui G18c Set up: Guarder Frame + Metal slide with 150% recoil spring and hammer spring Magazines cap: 24 + 1 Firing mode: full auto (no bursts) Mags before signs of breakage: 35ish at 25rds each Eleventh: Platform: Marui G18c Set up: Guarder Frame + stock slide with 200% recoil spring and 150% hammer spring Magazines cap: 24 + 1 Firing mode: full auto (no bursts) Mags before signs of breakage: 7 at 25rds each. My slide blew offf!!!! Comments: MY SLIDE BLEW OFFF!!!!! Summation/Conclusions: So… My tests revealed that the HK3 frame will outlast the Stock frame. Most HK3 Glocks already come pre-kitted with a stronger recoil spring than Marui. So if you take that into account and relate it to marui’s frame to spring ratio…. We can also see that using a Guarder frame with a stock upper assembly does absolutely nothing in terms of protecting the front screw casing. This is because, green gas/propane has a higher PSI value than duster gas which will create more force than the latter. Think of a rocket engine propelling a Voltswagen Beetle. Suggestions made from the exercise: There isn’t really much you can do in terms of preserving the front screw casing from what I gather. I’ve been working on Glocks primarily my whole airsoft career and I can’t really see a definitive way of fixing a broken screw casing. And rest assured, IT WILL BREAK…It’s only a matter of time. There is really only way I found to be effective in terms of preventative measures: On a Guarder, the screw casing will snap at the BASE of the screw post. Not around it. This is means that the front brass casing works but it only protects that which it is attached to. The brass casing itself doesn’t have any “roots” to the frame. This is why it snaps from the bottom. There is no strength there. What you can do to avoid snapping from the bottom is to take your front chassis off. There will be a big recess right above the front side of the trigger guard next to the screw casing. FILL THAT SHIT WITH JB WELD (or something similar) and the surrounding base are of the screw. What you’re doing here is CEMENTING the casing in. Let it dry. Sand to make it smooth. And then reinstall the chassis. Don’t worry, you’re not JB Welding anything. You can take the pistol down as much as you want without having to pry the front chassis from the frame. The HK3/Stock Marui Frame will crack before it completely explodes. You need to be aware of the status of the screw casing if you don’t want it to break. Once it explodes, it’s very hard to put it back together. Sometimes it can’t be done. So… When you spot the crack, JB Weld it and make sure that the crack is filled. Apply some JB weld around the casing. Let it dry. Buy a Guarder safety tag. Fit everything accordingly. Sand off some of the Weld if you have to but would rather not if you don’t need to. Reinstall everything. You can do both of these steps if you have patience even before you fire your first Glock. It will at least give you a longer lifespan than the stock. Also… MY SLIDE BLEW OFF!!!
__________________
"May you fight with the strength of ten full grown men." |
|
|
|

|
|
|
#111 |
|
Can you take a few pictures of the different frame's front screw post design?
|
|
|
|

|
|
|
#112 | |
|
Quote:
But here's a few. 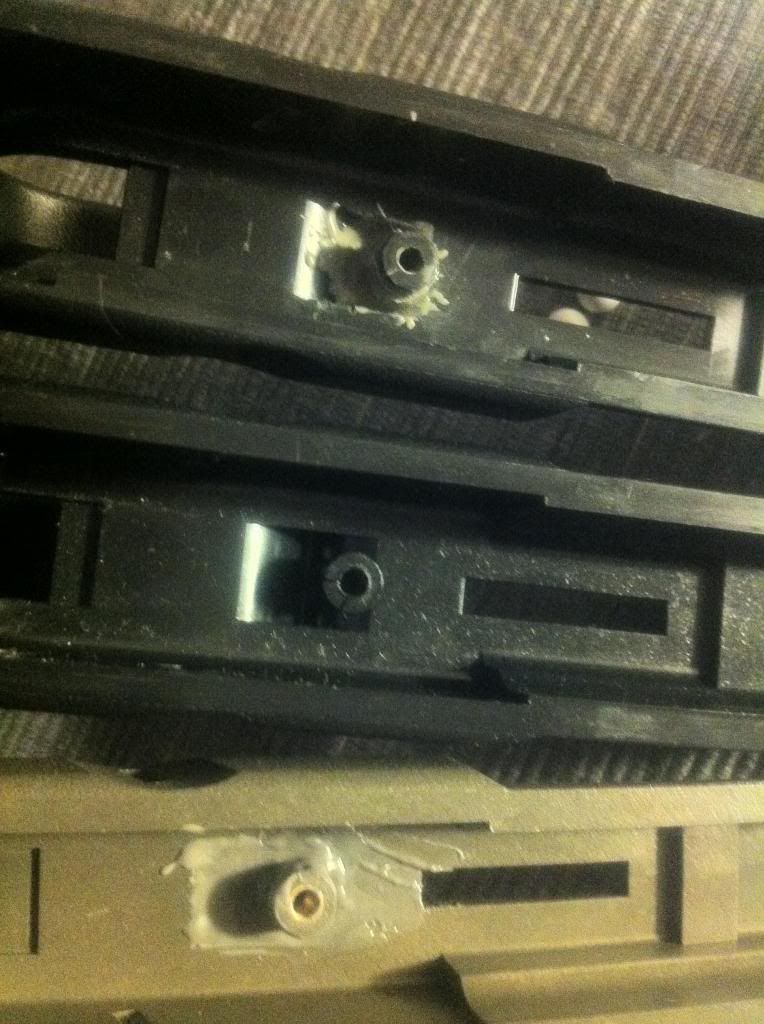 The two black ones are HK3 frames. The Green one is a Guarder frame.  HK3 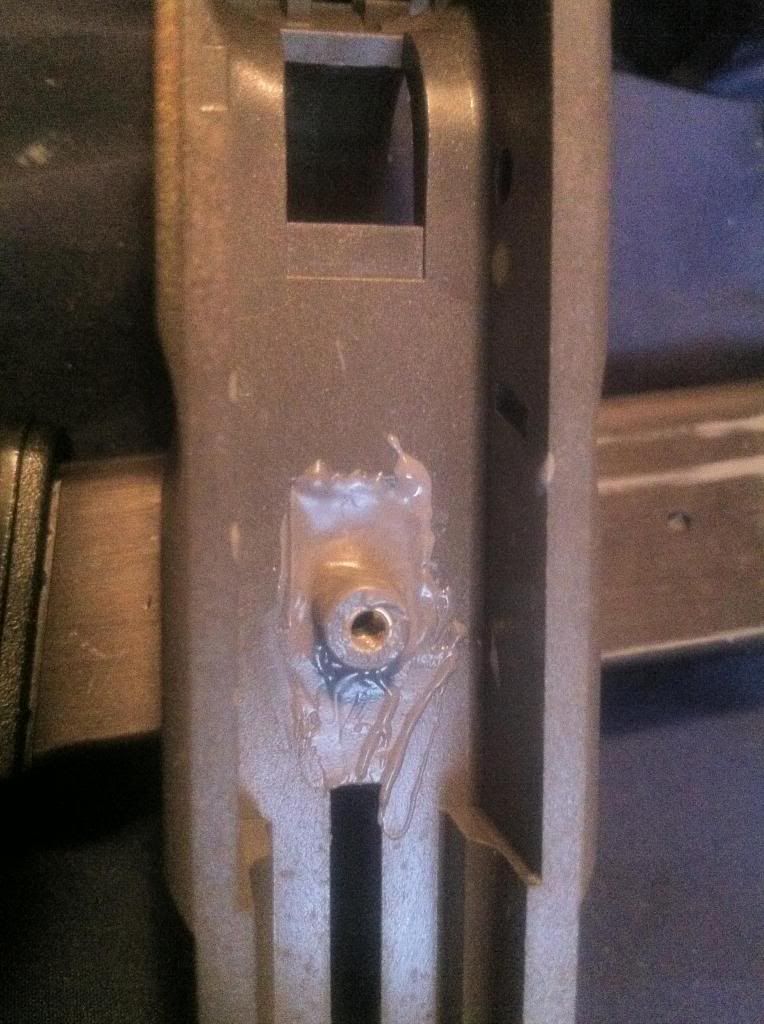 Guarder OD Frame after the screw casing snapped at the base and JB Welded. Notice how well the brass casing protected the plastic component of the casing. Virtually, intact. No cracks on it. Soo... THe brass casing works in that sense but its extent is limited to where it is "melded" to. 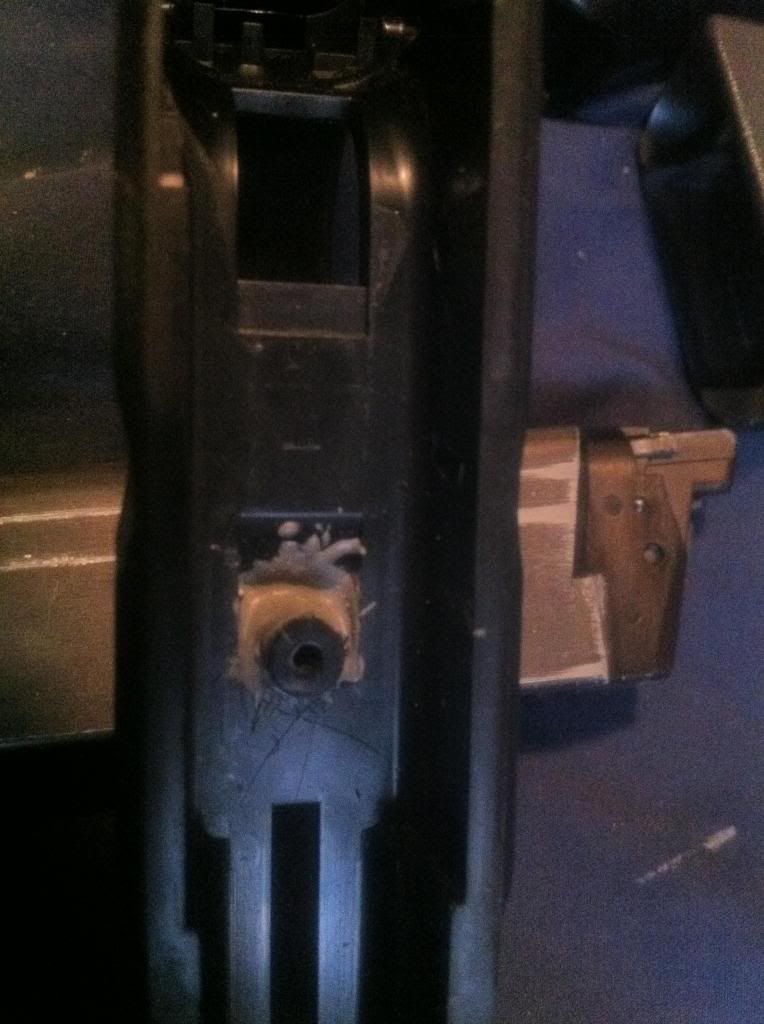 HK3 #1 frame before exploding. JB Welded the Crack. 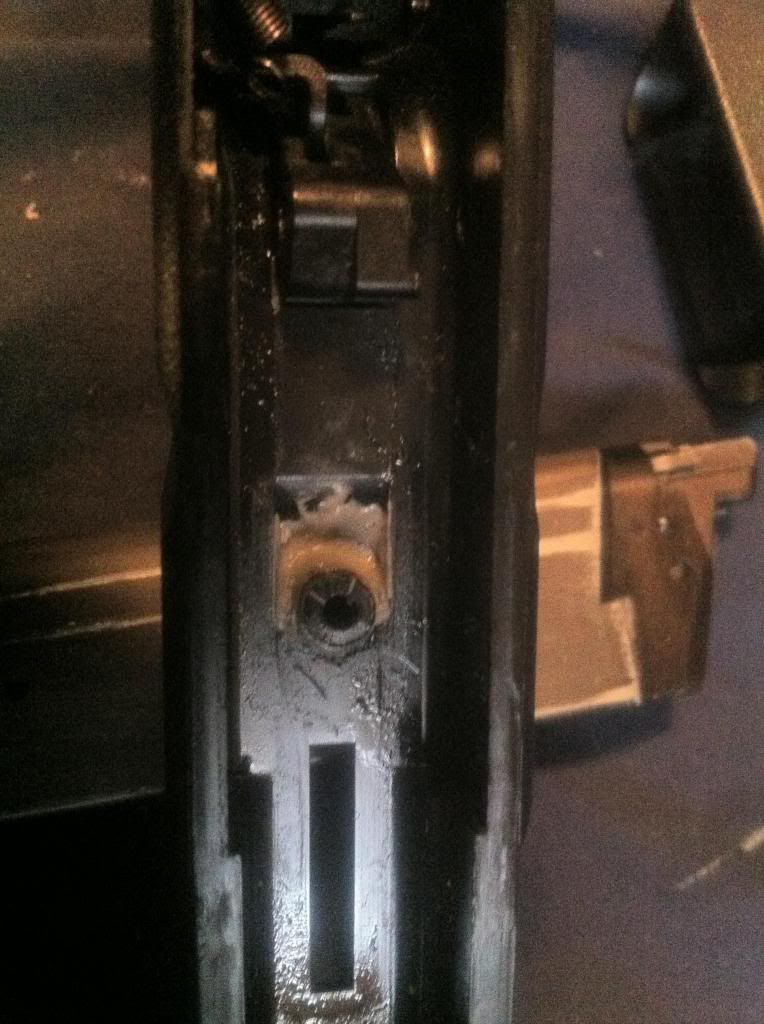 HK3 Frame #3 after a piece broke off. JB Welded back in place. 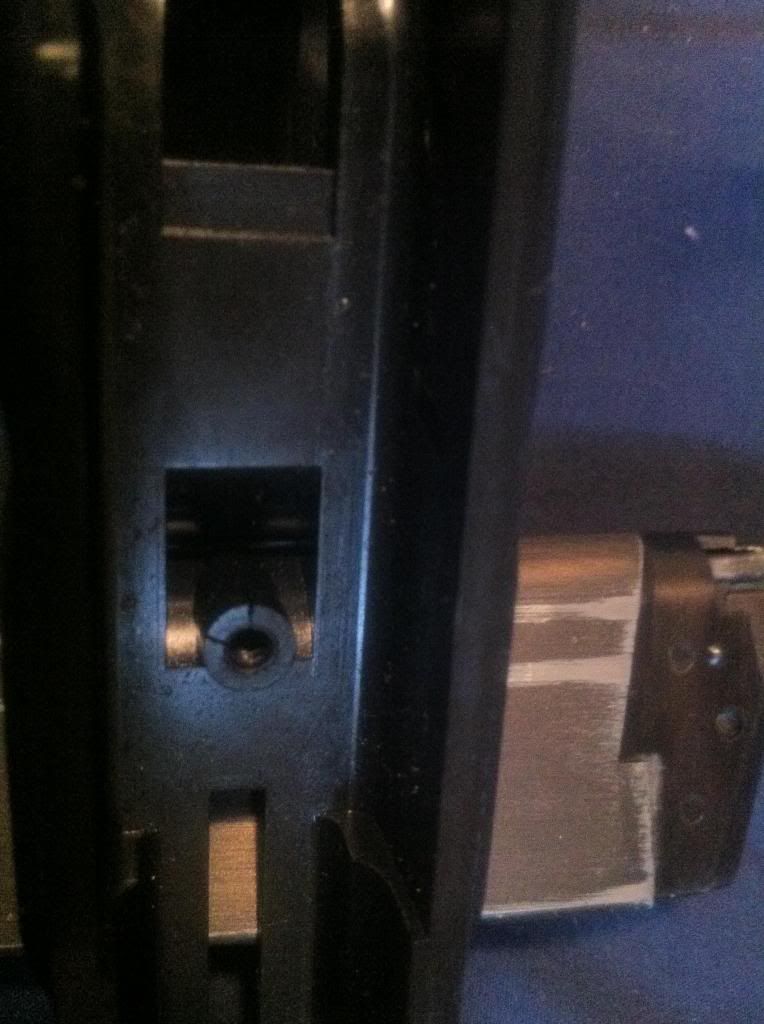 HK3 frame #3 prior to JB weld. 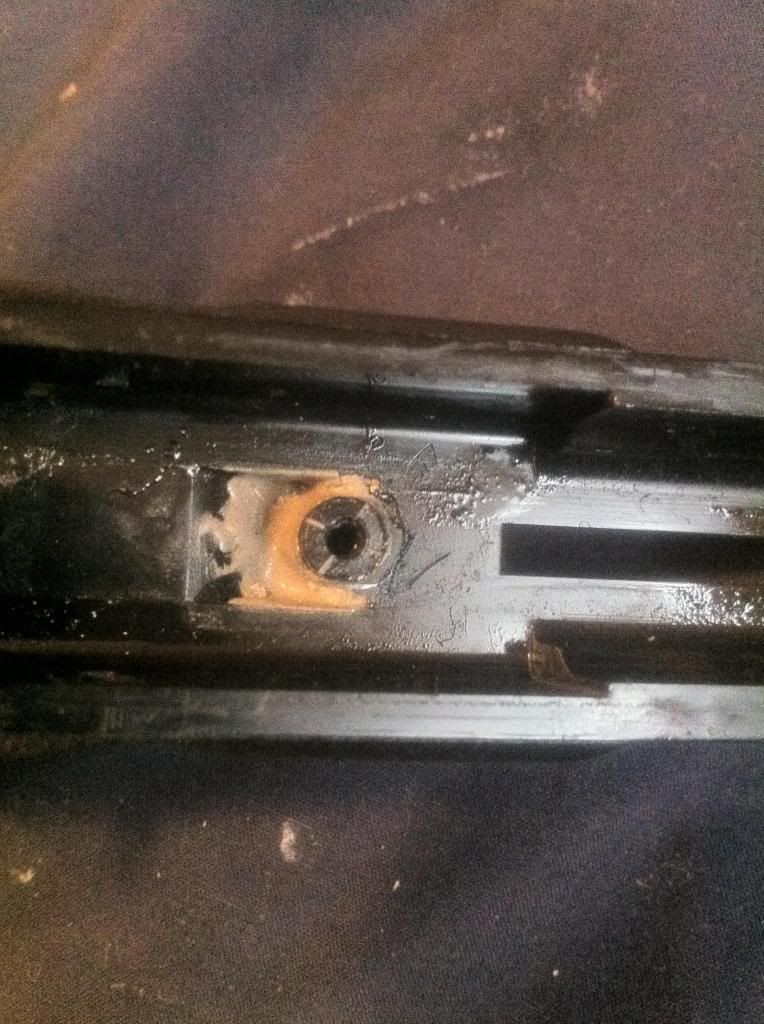 HK3 #4 Frame after it exploded. JB Welded back together. Took hours to piece that back together. 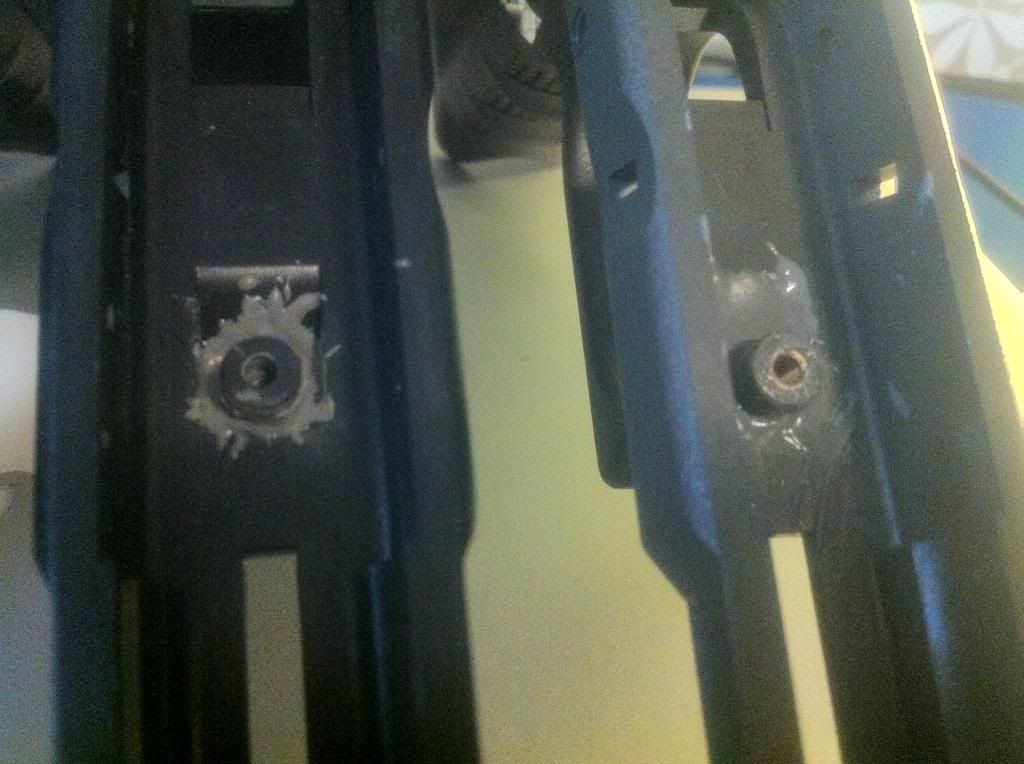 HK3 #1 frame vs Guarder Frame. There not much difference in the design of the HK3 frames from the Marui version but they do seem to outlast the Marui Stock frame. I haven't taken the measurement of the thickness of the screw casing but it looks to be the same.
__________________
"May you fight with the strength of ten full grown men." |
||
|
|

|
|
|
#113 |
|
Ordered a shooter design slide/barrel combo for my TM g17c, the slides seems too tight to function normally, it simply got stuck as I put it in. How much filing do I have to do and where should I be filing? Second thought, it maybe the BBU is where it got stuck at the hammer, coz when I just slide the empty slide on the gun, it slides ok, not as smooth as stock though. maybe i just have to install the zero hammer first and try out the slide again, that may help.
Last edited by thestone11; November 4th, 2012 at 11:33.. |
|
|
|

|
|
|
#114 |
|
Have a look here (page 2, post 23): http://www.airsoftcanada.com/showthr...t=60308&page=2
__________________
Kevorkian  I SUPPORT THE USE OF SILICA BB BASTARDS! |
|
|
|

|
|
|
#115 |
|
+1 above. Kevorkian hit the nail the head on that one.
If that doesnt work, you can file the actual rail on the slide itself. Its tough to do if you dont have the right tools. Also, depending where the slide is grinding (ie. it may be grinding on the frame) you can "raise" the rail guides of the lower assembley by puttitng duct tape on the bottom pf your chasis. It will raise the height of your slide off the frame just by a hairline which is enough clearnce for a smooth cycle. The GunsModify zero hammer I generally dont recommend to people because they cause the problems you've described. It requires a decent amount of work and break in period to work efficiently. they are up to version 3 of this product now and im sad to say that it hasn't really improved all that well from its previuos iterations. The website claims that you need to rack the slide about 100 times to break in the hammer bearing but even doing this, it still needed modification. Sometimes, i had to file a bit off the hammer bearing to get it work smoothly. They worst one i recently bought needed the hammer bearing modified as well as the bBh. Plus it requires lots of grease as it tends to eat the bbh if the hammer bearing isnt smooth or if it protrudes too much. The spinning wheel works much more effectively than the Zero hammer IMHO. but that's just me.
__________________
"May you fight with the strength of ten full grown men." |
|
|
|

|
|
|
#116 |
|
ps.
Also check to make that the outerbarrel has no friction to the innards of the slide. when the barrel tilts, sometimes the corner on the front of the chamber will grind with the underside of the slide. You will see some paint wear where the chamber grinds. you can round that corner off a bit for a smoother cycle. also make sure that muzzle isnt grinding too much on the barrel exit(the "bushing" of the glock) when its on full tilt. make sure that it is smooth and luned with grease.
__________________
"May you fight with the strength of ten full grown men." |
|
|
|

|
|
|
#117 |
|
Finally got all the parts that I needed and finished up my build. Everything still need time to break in, may need to do some filing to get the slide to cycle smoother. One thing I want to add is a buffer, any idea where can I get one or what is the best to use to make one? I am using Guarder 150% recoil spring and rod.
|
|
|
|

|
|
|
#118 |
|
Find a pen's tube that can go around the guide rod, cut it to however long you want the buffer to be and then jam the sucker in there.
If not, I have a couple of buffers here....
__________________
"May you fight with the strength of ten full grown men." |
|
|
|

|
|
|
#119 |
|
What is the best length for the buffer to be? Is it better to use a hard material or something like piece of rubber?
|
|
|
|

|
|
|
#120 |
|
usually buffers are installed to short stroke the gun and reduce the felt recoil. if this is your goal, about four buffers will achieve this. Three depending on how thick they are.
if you're going by measurements, around 1.5 to 2 cm will achieve this. generally as long as the gun can trip the disconnector and reset the hammer you can put as many as you want. but if it's too less it wont do much.
__________________
"May you fight with the strength of ten full grown men." |
|
|
|

|
  |
|
||||||
| Bookmarks |
|
|
 |